I write litle SMTP client for testing SMTP servers for open relays and other.

Download
Write in VB
Using tcpdump
Examples tcpdump
see traffic on the interface:
tcpdump -i eth0
see traffic on one host:
tcpdump host 192.168.1.1
see traffic on port:
tcpdump src port 80
tcpdump dst port 80
tcpdump port 80
see IP traffic on the host:
tcpdump ip host 192.168.1.1
see IP traffic on the net:
tcpdump ip net 192.168.1.0/24
see ARP traffic on the host:
tcpdump arp host 192.168.1.1
look RARP traffic on the host:
tcpdump rarp host 192.168.1.1
see traffic, except the host unixserver:
tcpdump not host unixserver
watch the traffic on the serverone and servertwo
tcpdump host serverone or host servertwo
view the contents of packets on the interface eth0 host cnn.com
tcpdump -X -i eth0 host cnn.com
spy numbers and passwords to icq
tcpdump -X -i eth0 port aol
view the contents of packets on the interface eth0 host cnn.com, while reading from each packet of 1500 bytes and not to convert IP to hostname
tcpdump -X -s 1500 -n -i eth0 host cnn.com
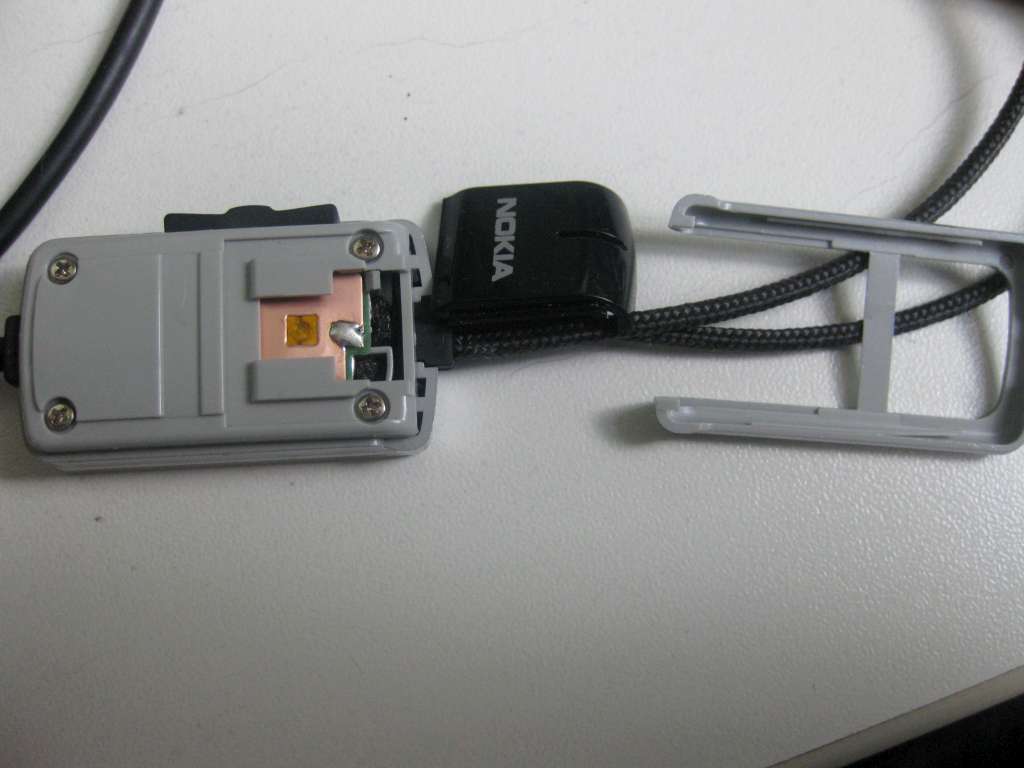
Brought me a headset HS-23 to pull out the wire, reaching for the phone.
All work on the recovery sets is illustrated in the photo.
To get started, explain the headset.
Reveals a plastic plate on the adhesive layer, and gently remove it.
Now you need to remove the top cover. Deduct the screwdriver from the wires going to the phone. First, on the one hand, and then the other. Remove the covers and click.
Gained access to the four screws. Twist off them.
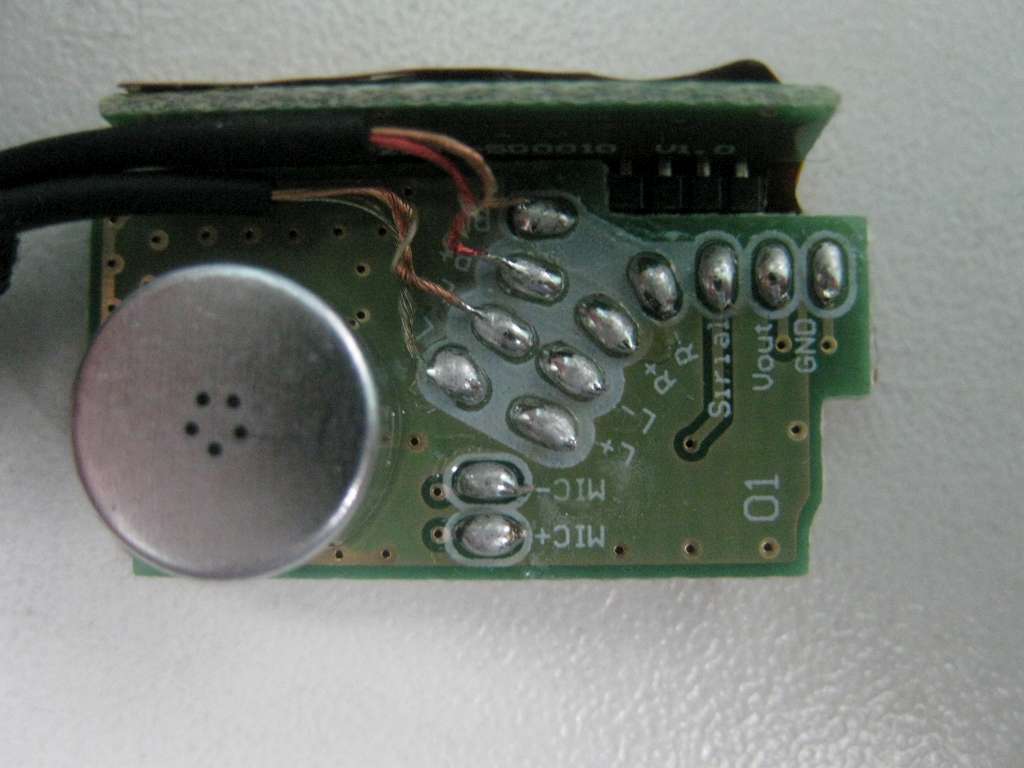
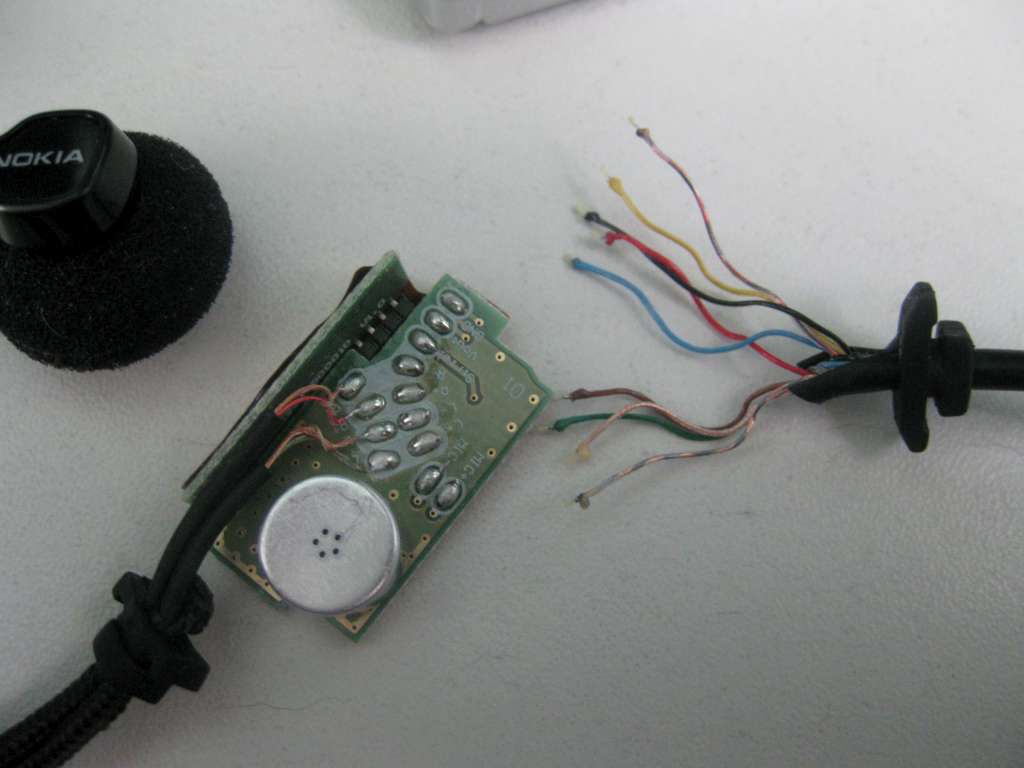
Takes charge the headset. Preparation for soldering wires.
Rations as follows:
MIC+ — yellow
MIC- — black
L+ — blue
L- — red/blue
R+ — brown
R- — gold/blue
Serial — golden
VOUT — red
GND — Green
Collect everything in reverse order — the headset works as new.
Принесли мне гарнитуру HS-23 с выдранным проводом, идущим к телефону.
Вся работа по восстановлению работоспособности гарнитуры проиллюстрирована на фото.
Для начала разберем гарнитуру.
Поддеваем пластиковую пластину на липком слое и аккуратно снимаем ее.
Теперь необходимо снять верхнюю крышку. Поддеваем отверткой со стороны провода идущего к телефону. Сначала с одной стороны, потом с другой. Снимаем крышку и кнопку.
Получили доступ к четырем винтам. Откручиваем их.
Достаем плату гарнитуры. Подготавливаем провода к пайке.
Пайку осуществляем следующим образом:
MIC+ — желтый
MIC- — черный
L+ — синий
L- — красный/синий
R+ — коричневый
R- — золотистый/синий
Serial — золотистый
VOUT — красный
GND — зеленый
Собираем все в обратном порядке — гарнитура работает как новая.


Did you know that the default in Linux every day about four o’clock in the morning to run various business objectives? For example cleaning of temporary directories, log files, compression, etc. Now imagine that the time on the server is configured correctly and that all of these tasks to run in peak hour traffic to your site.
Correctly set the date and time needed to perform the work, the scheduler tasks. In addition, they are written in all the main system log files and log-files web server.
Type the command date, to see the current date and time. If you want to change them, use the following format commands:
date MMDDhhmmCCYY.ss
MM — month, DD — day of the month, hh — hours, mm — minutes, CCYY — 4 digit year, ss — seconds
For example:
date 100615352009.30
This command will set the current date and time on October 06, 2009, 15:35:30.
Please note: the date and time can change only the root-user.
Professionals responsible for the safety nets used by the various tools to help them protect their networks and servers from malicious intrusions. They write great length chain filter iptables firewall and install the latest ..
You may also use them in their work and also write a long chain of rules, forgetting that help provide extra security can two files present on your system — /etc/hosts.allow and /etc/hosts.deny.
Once the TCP-packets have been transferred to a computer with Linux, among other actions, the process two files — /etc/hosts.allow and /etc/hosts.deny. These two files work as well as the standard firewall. Originally daemon tcpd handles packets passing through the contents of the file hosts.allow, and then through file hosts.deny.
Remember this, because if you make a mess of things in their contents, you may lose access to your server (if you configure them remotely). If the daemon does not find anything relevant in hosts.allow, it goes to the processing of the file hosts.deny.
The syntax of these files is very simple:
Service: IP-address or hostname
For example, if we want to block all smtp-packets coming to our server from mail.test.com, we need to put in hosts.deny file the following line:
smtp: mail.test.com
We can also choose to replace the host name and its IP-address (the best physical, thus avoiding the problems of security in DNS-server):
smtp: 192.168.2.10
With success, you can use and an excellent opportunity to use the mark «.» In the address bar to indicate the network. For example, if we want to allow access to our server on http from the entire network 192.168.2.0/24, we should write in the hosts.allow as follows:
http:192.168.2.
We can also use this sign if we want to allow access to any service of all the computers of our domain, pointing to hosts.allow as follows:
http:.test.com
Then all computers domain test.ru will have access to the web service on our server.
Well, the easiest way (which is typically used by beginners and administrators) — specify:
mysqld: ALL
This record is made available for all your service mysql. I hope you have guessed what file do I put this line?
Certainly in the /etc/hosts.deny! But in /etc/hosts.allow to make a record type:
mysqld: LOCAL
And then your mysql is available for local applications!
Please note — the contents of the files /etc/hosts.allow and /etc/hosts.deny depends on your needs to protect your server. Try, if needed opening or closing access to services for one reason or the other. But do not forget that the writing after the «:» the words «ALL» (in the file /etc/hosts.allow) does not give you guarantees of security of your server!
Good luck!
We begin with preparation
yum pre-setup
If you want to use yum, you should set up OpenVZ yum repository first.
Download openvz.repo file and put it to your /etc/yum.repos.d/ repository. This can be achieved by the following commands, as root:
# cd /etc/yum.repos.d
# wget http://download.openvz.org/openvz.repo
# rpm —import http://download.openvz.org/RPM-GPG-Key-OpenVZ
Kernel installation
Run the following command
# yum install ovzkernel[-smp or -ent]
smp symmetric multiprocessor up to 4 GB of RAM 10-20 Containers
ent SMP + PAE support + 4/4GB split up to 64 GB of RAM >20-30 Containers
Configuring the bootloader
In case GRUB is used as the boot loader, it will be configured automatically: lines similar to these will be added to the /boot/grub/grub.conf file:
Make default=0 to boot vz kernel first.
Config
There are a number of kernel parameters that should be set for OpenVZ to work correctly. These parameters are stored in /etc/sysctl.conf file. Here are the relevant portions of the file; please edit accordingly.
# On Hardware Node we generally need
# packet forwarding enabled and proxy arp disabled
net.ipv4.ip_forward = 1
net.ipv6.conf.default.forwarding = 1
net.ipv6.conf.all.forwarding = 1
net.ipv4.conf.default.proxy_arp = 0
# Enables source route verification
net.ipv4.conf.all.rp_filter = 1
# Enables the magic-sysrq key
kernel.sysrq = 1
# We do not want all our interfaces to send redirects
net.ipv4.conf.default.send_redirects = 1
net.ipv4.conf.all.send_redirects = 0
SELinux should be disabled. To that effect, put the following line to /etc/sysconfig/selinux:
SELINUX=disabled
Rebooting into OpenVZ kernel
Installing the utilities
# yum install vzctl vzquota
on x64
# yum install vzctl.x86_64 vzquota.x86_64
Starting OpenVZ
# /sbin/service vz start
Next OS template
An OS template is basically a set of packages from some Linux distribution used to populate a container.
Creating an OS template cache
You can create an OS template cache using template utilities and OS template metadata right on your hardware node. The process is automated and will take from about 10 minutes to a few hours, depending on the network speed, and the result will be most up-to-date template cache.
Installing template utilities
You have to install a few packages in order to be able to create/update OS template cache(s).
Using yum
# yum install vzpkg vzyum vzrpm43-python vzrpm44-python vzctl-lib
Installing OS template metadata
To see which templates are available, run
# yum search vztmpl
To install some of the templates, run
# yum install vztmpl-XXX […]
Get it in http://download.openvz.org/template/precreated/
In order to use precreated template cache files, download files for chosen OS distributions and place them as-is to the /vz/template/cache directory.
Create and start a container
To create and start a container, run the following commands:
[host-node]# vzctl create 128 —ostemplate centos-5-i386-minimal
[host-node]# vzctl set 128 —ipadd 10.1.2.128 —save
[host-node]# vzctl set 128 —nameserver 10.0.2.128 —save
[host-node]# vzctl start 128
Your freshly-created container should be up and running now; you can see its processes:
[host-node]# vzctl exec 128 ps ax
Stop and destroy the container
To stop container:
[host-node]# vzctl stop 128
And to destroy container:
[host-node]# vzctl destroy 128
I’s all
SATA drives show up in “Safely Remove Hardware” icon when the nForce SATA drivers are installed under XP
Click Start > Run and type:
regedit
Press ENTER
Navigate to the following registry key:
HKEY_LOCAL_MACHINESYSTEMCurrentControlSetServicesnvata
Right-click in the right hand pane and choose New > DWORD
Create a new DWORD value:
DisableRemovable
Right-click on this new value and choose Modify and change the value to 1
Close Regedit
Restart Windows
Upon termination of all tests from all volume of letters (44552 letters) it has been allocated 125 absolutely валидных letters on the basis of which parameters FalseNegative and FalsePositive have been calculated. If to exclude the first day of testing it is visible as commercial products go a leg to a leg at the analysis of a spam. Spamassassin all it is calculated on the analysis of a foreign spam and often passes letters because of absence of normalization of a content. Commercial products lead letters to the certain kind. For example, often used spammers a method of an insert of superfluous signs in words of type: , and also replacement of Turk letters with English letters similar on a writing, are absolutely inefficient against normalization at which the deformed word all will equally turn to «dispatches» and will get under the contextual analysis adding for each such word certain quantity of points to the letter. In turn, SpamAssassin well enough distinguishes a foreign spam of type « Medical, Viagra, Cialis, Enlargement », and also well filters « bayes poisoning » contextual analyzers.
In occasion of dnsbl-lists the opinion has developed ambiguous. On the one hand, popularity public dnsbl is very high, and they can provide protection against a spam up to the certain degree. But, on the other hand, to use dnsbl-lists as panacea it is impossible, as everyone happen FP at work with valid domains. As if to check of entering connections on RFC (FastBL) during testing there was no FP and the level of a filtration is comparable to commercial products. But it already other history. 🙂
Well, and at last, I have decided to tabulate variants of events in the event that contextual analyzers would work in pair with DNSBL-sheets. Predictably, I have received 100 % efficiency of a filtration of a spam even at use of foreign product Apache SpamAssassin.
